1 Fast, light, cheap, indestructible, power-friendly external storage drive
aka 1x 16-128GB External SSD for $5!
WUN:
2-4 extra flash drives of the same size
1 high speed USB hub
an external enclosure
I used to sell 16GB MicroSD cards on eBay. Probably because I've always found portable digital storage pretty neat, especially when you can fit the largest single collection of human knowledge (wikipedia) in the space the size of a fingernail (MicroSD ;). Actually, you can store it twice on a 16GB card.
Anyway, I have a bunch of extra flash memory cards + microSD cards so I thought-->
Wouldn't it be cool if I could daisy-chain my extra USB/flash memory cards together on a USB hub and use them all as one high-capacity, fast external drive?
Lugging around a regular external hard-drive not only poses the risk of it breaking due to all the jostling around, but it also saps vital juice from your laptop.
So, I went to the cloud to investigate my idea.
Apparently, I'm not the first one to try this, and it can be done. However, only Linux can do it.
So, install/boot Linux and open up terminal and type 'sudo change passwd' to create a new superuser password for yourself, and then type 'su' to get the superuser permissions.
The program that can create a software RAID is called mdadm. So just type 'apt-get install mdadm' and after it downloads/etc press tab to highlight the OK and finish the installation.
Now for the fun!

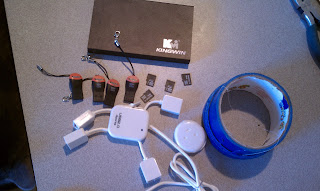
Get your flash drives together (or in my case, MicroSD cards and USB adapters), a USB 2.0 (or higher) hub, and an enclosure. I also used some duct tape, obviously.

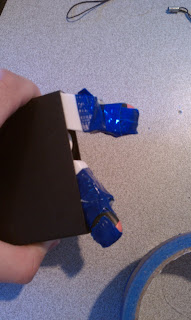
Assemble everything- there may be casualties (RIP head of USB cartoon - guy)
I taped the drives to the USB hub sockets so they wouldn't accidentally drop out over time. Seems to have worked thus far (it's been approx 2 months)
Now you can plug in your hub and create the RAID!
This is really just two steps:
Create the raid
Assemble & mount!
To create the raid, you need to know what devices to include.
To find out what Linux calls the USB flash drives, run the following command:
dmesg | grep "Attached SCSI"
You should see something like this:
[ 6.218670] sd 5:0:0:0: [sdc] Attached SCSI removable disk
[ 6.490321] sd 6:0:0:0: [sdd] Attached SCSI removable disk
[ 6.760086] sd 7:0:0:0: [sde] Attached SCSI removable disk
[ 7.033966] sd 8:0:0:0: [sdf] Attached SCSI removable disk
So, take note of what is in the brackets that starts with 'sd'- in this case, sdc, sdd, sde, and sdf. Those are the USB drives that we want to use for the RAID.
The next step is pretty simple- just run this command:
root@ubuntu:/home/will# mdadm --create --verbose /dev/md0 --level=0 --raid-devices=4 /dev/sd{c,d,e,f}
This creates a level 0 RAID array (uses multiple disks as one big disk) whose information is stored in /dev/md0 with the 4 devices sdc/d/e/f. If you want to do this with just two drives, and your dmesg command showed them as sdg and sdh, you would run this:
mdadm --create --verbose /dev/md0 --level=0 --raid-devices=2 /dev/sd{g,h}
Now, if you get an error, it may be because your sdc/sdd / whatever actually are followed by a number. You can check this by running
fdisk -l
And scrolling through the results until you find your drives (identify them by looking at the size, in my case 16GB each)- and see if they are indeed sdc/whatever or, like what happened to me, sdc5 and sdd5 etc.
Another issue is the flash drives could be mounted, as in, ready for use, which would prevent them from being used in a RAID. This is what I had to run:
root@ubuntu:/home/will# umount /dev/sdc5
root@ubuntu:/home/will# umount /dev/sde5
root@ubuntu:/home/will# umount /dev/sdd5
root@ubuntu:/home/will# umount /dev/sdf5
root@ubuntu:/home/will# mdadm --create --verbose /dev/md0 --level=0 --raid-devices=4 /dev/sd{c,d,e,f}5
That unmounted (umount) the USB drives then successfully created the RAID.
Now we just need to format the raid and mount it!
You can do this by running the following:
root@ubuntu:/home/will# mkfs.ext2 /dev/md0
root@ubuntu:/home/will# tune2fs -c 0 -j /dev/md0
root@ubuntu:/home/will# mount /dev/md0 /mnt
Now it should show up in your file explorer and be usable!! One last thing:
In order to restart the RAID or use it on another computer, you want to write down (or use the mouse to copy and paste) the UUID, which you can get by running
root@ubuntu:/home/will# mdadm --detail /dev/md0
In my case, the UUID was:
1ad478f8:18d8cbb6:43ec06bf:9b2e6280
1ad478f8:18d8cbb6:43ec06bf:9b2e6280
When you want to unplug your RAID, umount /dev/md0 (or right click in the file explorer and Unmount) and then stop the raid:
mdadm --stop /dev/md0
To start it again (on any computer with Linux and mdadm), just type this as superuser:
mdadm --verbose -A /dev/md0 -u 1ad478f8:18d8cbb6:43ec06bf:9b2e6280
using your UUID.
If you don't want to have to type that every time you can create some shortcuts in Xbindkeys:
#Stop USB
"mdadm --stop /dev/md0"
Mod4 + Z
#Start USB
"mdadm --verbose -A /dev/md0 -u 1ad478f8:18d8cbb6:43ec06bf:9b2e6280"
Mod4 + U
That lets me start the RAID by pressing Windows/Start key + U, and stop it with Start + Z.
See more about xbindkeys in my Linux post.
Credits:
http://linuxgazette.net/151/weiner.html
using ultimate edition.
ReplyDeletethe brain dead moronic corporate flushed thinking wont deduce anything worthy.
got 186 gb in raid0 from the flash disks i collected over the years.........extremely reliable but hub gets very hot and need to air cool the box it is in.
my 500gb hdd cant catch up in speed.........
ram doom3 in wine on disk created ..........blatantly awesome...
good article and luv u for this.......hopefully when i get time shall post it soon........
used it on a crappy acer aspire ......i could see youtube videos on ubuntu.....otherwise strictly using puppy linux.
hey really good article but can you share how you would tweak it for a level 1 RAID? I tried changing the level to '1' but I get an error saying '/home/will/#: No such file or directory'. So then I try putting ~/ i dunno why but it doesn't work anyway.
ReplyDeletehelp?
Thank you for this. Very handy.
ReplyDelete