Monday, May 23, 2011

Motorola Droid Bionic

Hopefully releasing within 30 days of 5/26/2011.

Questions for the Bionic:

1. 1900+ mAH battery?
2. 512MB or 1GB RAM?
3. How much will I have to pay Verizon with no unlimited plan?
4. Release date?

Questions for the LG Revolution:

1. Will you actually come out 5/26/2011?
2. RAM?
3. Battery?
4. Why do I have to remove the battery to access the MicroSD slot?

This post was a test to see what shows up in Google 'News'.

Tuesday, February 22, 2011

Home Media Server

After building an over-powered computer (pretty much any computer these days) for fun/charity (BOINC), I couldn't help but wonder what I could do with it.

How can an always-on home supercomputer/media server impact your everyday life?

-Stream music to your phone so you can have your entire library at your fingertips, regardless of where you are
-Serve media/files to any computer, anywhere in the world
-Close the loop on a smart-home setup

And a lot more.

This post will talk only about the technical side of how to get your home server computer talking to your other devices. Refer to my Smart Home On a Budget post for more cool stuff.

Fast-stuff:
Teamviewer
VNC
GMote
MultiRemote
AWinampRemote (AWRemote)
Windows Remote Desktop
Kylo Browser

With the above stuff, you can literally use your home computer from anywhere in the world over the internet. You can also stream your music to your phone, control your home music with your phone, and control your home computer with your phone.... you get the idea.


Harder stuff:
VPN for seamless file sharing / networking over the internet (Windows 7)

Step 1.
Create the incoming connection on the home computer:
Press Start, type in "Netw sha" and press enter
On the left, click "change adapter settings"
Press Alt, then F, then N
Check your user name and I suggest adding a new "someone" just for this purpose. Make up the User name, full name and password. Click next
Check the box that says "Through the internet"
Click next
Click Allow access (everything except TCP/IPv6 should be checked, unless you're reading this in the future when TCP/IPv4 has been abolished)
Before moving on, we need 3 pieces of data:
1. Your home server's IP (http://www.whatismyip.com/)
2. Your home server's default gateway (press start, type cmd, press enter, type "ipconfig" into black command prompt, look where it says default gateway (probably 192.168.1.1 or something) if there are multiple adapters you should look at the one that is Local Area Connection or Wireless (depending on your connection to the internet)
3. The IPv4 address displayed two lines above the default gateway

Write these three things down, we shall call them THING1 (IP), THING2 (default gateway) and THING3 (IPv4 address).


Step 2.
Create the connection on your laptop or other computer you want to use to connect to your home computer:
Press Start, type in "Netw sha" and press enter
Click "Set up a new connection or network"
Select "Connect to a workplace" and click Next
Select "Use my internet connection (VPN)"
For internet address, type in THING1
I used the computer name of my media/server computer for Destination name, but I don't think it matters
Check "Don't connect now..." and click next
Enter the User name and password you created in Step 1, then click create
Don't connect yet.

Step 3. Fix connection thingies (two parts)
A) Finish step 2 (on laptop) by going back to adapter settings, and right clicking the new VPN connection (named whatever you put in the Destination name box) and clicking Properties
Under Options, uncheck "Include Windows logon domain"
Under Security, choose the Point to Point... PPTP drop-down for Type of VPN
Under Networking, highlight Internet Protocol Version 4, and click Properties
Click Advanced
Uncheck "Use default gateway on remote network"
Click OK, OK, OK

B) Router config
Look up your router's manual (the flashing thing that has antennas / plugs into the modem) to find out where the config address is... it's probably the default gateway (THING2)
Open a web browser and enter this (e.g. "192.168.1.1") and use the logon the manual says (or whatever was set up when it was installed- ask that person). It's likely user: "admin" pass: "admin"
Find "Port forwarding" and open a TCP service for PPTP (probably is a drop-down) and it should be port 1723 to port 1723
The server IP address should be set to THING3 (probably something like 192.168.1.2)
Click save

You should be DONE! Just double click on the connection on your laptop computer and login with the username you created.

Now you can click "Computer," and click "map network drive" and type in "\\THING3\sharename" where "sharename" = the name you've set of whatever folder you want to share (for example if it's all of drive C, you would right click on C in My computer from the media/home server/computer, click properties, then sharing, then advanced sharing, then check share this folder, and choose your Share name! you may also have to disable password protection right below where you clicked "advanced sharing")

I would uncheck "reconnect at logon" and check "connect using different credentials" before clicking finish, if I were you.

Wednesday, December 8, 2010

SSD Flash USB Soft RAID

WUG:
1 Fast, light, cheap, indestructible, power-friendly external storage drive
aka 1x 16-128GB External SSD for $5!

WUN:
2-4 extra flash drives of the same size
1 high speed USB hub
an external enclosure

I used to sell 16GB MicroSD cards on eBay. Probably because I've always found portable digital storage pretty neat, especially when you can fit the largest single collection of human knowledge (wikipedia) in the space the size of a fingernail (MicroSD ;). Actually, you can store it twice on a 16GB card.

Anyway, I have a bunch of extra flash memory cards + microSD cards so I thought-->

Wouldn't it be cool if I could daisy-chain my extra USB/flash memory cards together on a USB hub and use them all as one high-capacity, fast external drive?
Lugging around a regular external hard-drive not only poses the risk of it breaking due to all the jostling around, but it also saps vital juice from your laptop.

So, I went to the cloud to investigate my idea.

Apparently, I'm not the first one to try this, and it can be done. However, only Linux can do it.

So, install/boot Linux and open up terminal and type 'sudo change passwd' to create a new superuser password for yourself, and then type 'su' to get the superuser permissions.

The program that can create a software RAID is called mdadm. So just type 'apt-get install mdadm' and after it downloads/etc press tab to highlight the OK and finish the installation.

Now for the fun!


Get your flash drives together (or in my case, MicroSD cards and USB adapters), a USB 2.0 (or higher) hub, and an enclosure. I also used some duct tape, obviously.


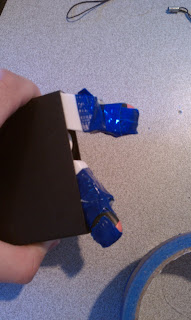
Assemble everything- there may be casualties (RIP head of USB cartoon - guy)

I taped the drives to the USB hub sockets so they wouldn't accidentally drop out over time. Seems to have worked thus far (it's been approx 2 months)

Now you can plug in your hub and create the RAID!

This is really just two steps:
Create the raid
Assemble & mount!

To create the raid, you need to know what devices to include.

To find out what Linux calls the USB flash drives, run the following command:
dmesg | grep "Attached SCSI"

You should see something like this:

[ 6.218670] sd 5:0:0:0: [sdc] Attached SCSI removable disk
[ 6.490321] sd 6:0:0:0: [sdd] Attached SCSI removable disk
[ 6.760086] sd 7:0:0:0: [sde] Attached SCSI removable disk
[ 7.033966] sd 8:0:0:0: [sdf] Attached SCSI removable disk

So, take note of what is in the brackets that starts with 'sd'- in this case, sdc, sdd, sde, and sdf. Those are the USB drives that we want to use for the RAID.

The next step is pretty simple- just run this command:

root@ubuntu:/home/will# mdadm --create --verbose /dev/md0 --level=0 --raid-devices=4 /dev/sd{c,d,e,f}

This creates a level 0 RAID array (uses multiple disks as one big disk) whose information is stored in /dev/md0 with the 4 devices sdc/d/e/f. If you want to do this with just two drives, and your dmesg command showed them as sdg and sdh, you would run this:

mdadm --create --verbose /dev/md0 --level=0 --raid-devices=2 /dev/sd{g,h}

Now, if you get an error, it may be because your sdc/sdd / whatever actually are followed by a number. You can check this by running

fdisk -l

And scrolling through the results until you find your drives (identify them by looking at the size, in my case 16GB each)- and see if they are indeed sdc/whatever or, like what happened to me, sdc5 and sdd5 etc.

Another issue is the flash drives could be mounted, as in, ready for use, which would prevent them from being used in a RAID. This is what I had to run:

root@ubuntu:/home/will# umount /dev/sdc5
root@ubuntu:/home/will# umount /dev/sde5
root@ubuntu:/home/will# umount /dev/sdd5
root@ubuntu:/home/will# umount /dev/sdf5
root@ubuntu:/home/will# mdadm --create --verbose /dev/md0 --level=0 --raid-devices=4 /dev/sd{c,d,e,f}5

That unmounted (umount) the USB drives then successfully created the RAID.

Now we just need to format the raid and mount it!
You can do this by running the following:

root@ubuntu:/home/will# mkfs.ext2 /dev/md0
root@ubuntu:/home/will# tune2fs -c 0 -j /dev/md0
root@ubuntu:/home/will# mount /dev/md0 /mnt

Now it should show up in your file explorer and be usable!! One last thing:

In order to restart the RAID or use it on another computer, you want to write down (or use the mouse to copy and paste) the UUID, which you can get by running
root@ubuntu:/home/will# mdadm --detail /dev/md0

In my case, the UUID was:

1ad478f8:18d8cbb6:43ec06bf:9b2e6280

When you want to unplug your RAID, umount /dev/md0 (or right click in the file explorer and Unmount) and then stop the raid:
mdadm --stop /dev/md0

To start it again (on any computer with Linux and mdadm), just type this as superuser:

mdadm --verbose -A /dev/md0 -u 1ad478f8:18d8cbb6:43ec06bf:9b2e6280
using your UUID.

If you don't want to have to type that every time you can create some shortcuts in Xbindkeys:
#Stop USB
"mdadm --stop /dev/md0"
Mod4 + Z

#Start USB
"mdadm --verbose -A /dev/md0 -u 1ad478f8:18d8cbb6:43ec06bf:9b2e6280"
Mod4 + U

That lets me start the RAID by pressing Windows/Start key + U, and stop it with Start + Z.

See more about xbindkeys in my Linux post.

Credits:
http://linuxgazette.net/151/weiner.html

Sunday, October 31, 2010

Make the Most of your Android

Aside from the many, many apps available to make your phone better and more useful (like gmote, angry birds, evernote, iSearch, tunewiki, launcherpro, dolphin browser, etc), there is also the more 'advanced,' 'techie' thing you've always heard of and meant to research. Rooting. And whatnot.

There are plenty of guides explaining what rooting is and how to do it (see http://forum.xda-developers.com), but... who cares, and why should you?

1. Free Wifi Tether regardless of network
2. Faster phone
3. Better battery life
4. Backup ALL your data with one click
5. Better UI and overall phone experience :)

So when you decide to take this plunge, what does it mean?

-Approx 1 hour of total time commitment, up to 3
-Void your warranty, BUT YOU CAN REVERT and UN-void it

Here's an example of someone's signature on the techie forums:

[ROM] Cyanogenmod 6.0.2 (Froyo)
[Recovery] ClockWorkMod 2.5.0.5
[Radio] 2.15.00.07.28 (Thanks adrynalyne)
[Launcher] LauncherPro v0.7.8.1
[Storage] 32GB Sandisk Micro SDHC Class 4
[Kernel] KingxKlick BFS #1 "Told you so" 1.113 OC/UV
[Status] S-off w/ Unrevoked forever

You may notice that a couple things, like a 32GB microSD card and Launcher Pro, you can get right now. And you should. (PM me to buy a 32GB card for $60). Launcher Pro is free on the market.

But for all the other stuff, ROM, Recovery, custom Radio / Kernel, you need to ROOT. The easiest way to do that is with http://www.unrevoked.com/

ROOT in 5 Minutes


It literally takes about 3 clicks before you're rooting if you use unrevoked. Unless you've already done so, you should first install these drivers.

If you need more info/instructions, or still aren't sold on Rooting, go here.

Install a Recovery Mod to backup your phone in one click (and flash a new ROM)

After rooting simply download "Superuser" from the marketplace, install, and then also get "Clockwork Recovery Mod" from the market. Install.

In Clockwork Recovery Mod you can install a recovery partition with one click that will allow you to backup your entire phone to an SD card, and flash new ROMs etc.

ROMs

Think of a ROM as another version of Windows or Mac (Leopard, 7 versus XP, etc.)... but free.

There are tons of them out there (for example:
http://theunlockr.com/downloads/android-downloads/android-roms/
http://www.theincrediblelist.com/roms/ )
But let me save you hours of reading the forums and testing different ones... and just tell you which one is the best:
http://forum.xda-developers.com/showthread.php?t=764787

Just read his post and follow the instructions - you'll be up and running in no time :)

Remember to backup your device before you flash a ROM - and download a neat app called "Titanium backup" to backup all your apps + data before flashing a new ROM. There is also an alternative called "AppBrain" which I've heard good things about.

Enjoy your new and improved Incredible!!


Finally, if you don't have time to root and flash a ROM but want the Android Wifi Tether application, use the QR code below (with the app: "barcode scanner"):

Thursday, February 25, 2010

Windows Must-Dos (all free)

This guide will:

1. Provide you with the information to keep your computer fast, clean & virus-free 2. Teach you how to do everyday computer activities more efficiently
3. Save you hundreds of hours of time, hassle and headache

What you need:
-A decent internet connection
-About an hour
-Willingness to be more efficient (assumed, as you are on this blog)

What you get:
-A leaner, meaner, faster machine
-Thousands of hours in increased productivity*
-Immunization of your machine against viruses, trojans, malware, spyware and unwanted start-up values

*Assuming you will live at least 10 more years, and use your computer ~2 hrs/day

Background
E
very Windows machine requires work to keep it fast, functional and virus/spyware free. Even if you don't ever use the internet, windows will eventually bog down your system with shadow copies, system restore files, disk fragments, random clutter (temp files, prefetch data, etc) and erroneous registry keys.

Not to fear! It is easy to maintain your computer if you know how (and you are about to).

Clean Windows & Immunize!

1. Download.com is your friend!
Use it to get the following:
CCleaner (short for "crap cleaner")
AVG Anti-virus
Ad-Aware
Spybot Search & Destroy!

2. Use lots of Soap
Download and run the best free virus-killer
Install AVG, Ad-Aware, CCleaner and Spybot. Leave CCleaner alone for now.
Depending on the speed of your computer, run all 3 (or one by one), allowing Spybot to install TeaTimer, backup your registry and immunize your system.
When they are done have no fear in clicking "fix these issues." All you will lose is the evil spyware on your machine.

Congratulations! You have made your internet and network faster, and have stopped evil companies from stealing your identity.

3. Throw out the Garbage
Hold down the CTRL key then press "a." Let go.
Hold down CTRL and press "c." Let go.
Now press the Windows Start key (the flag), type "notepad," and press enter.
CTRL "v"
CTRL "s" & name this whatever you want and save it to the desktop.

Congratulations, you just performed a somewhat complex action without the mouse. +1 for efficiency.

Finish all miscellaneous projects you are working on, close your internet browser and close all other programs (except notepad and CCleaner).

Unless you have a particular attachment to your browsing history (which is different than bookmarks), you can click "Run Cleaner" in CCleaner. This will clear temporary files, your recycling bin, error reporting, the system's memory of all that text you just pasted into notepad, and cookies/internet history.

When it's finished, look at how many MBs (or GBs) of efficiency you just gained (displayed under "Cleaning Complete.")

You can now use CCleaner to fix your registry (click "Registry," or, if you are more advanced, use the "Alt" + "Tab" shortcut to select CCleaner, and press "g" then "s".) After scanning press "Fix" and backup if you wish.

The next step is going to be the most fun.
You know all of those programs that start when you turn on your computer? Like MSN Messenger, AIM, etc.? We are about to slay them.
They will no longer start without your direct consent.
In the "Tools" window click "Startup" and look at how inefficient your computer is being.

Silly Windows, I don't need half of these things.
You can pretty safely disable ALL of these things, (because it's easy to re-enable them), but I would suggest leaving things that you want, like SpybotSD Tea Timer (this maintains your registry values and prevents programs from editing it without your permission, so no new program will ever put itself in this list without your knowledge), Battery Monitor, Kernel & Hardware Abstraction Layer, and anything that has it's home file in C:\Windows.

Now all that's left is a few system errands.
Press the Start key and right click on "Computer" Then click "Properties"
On the left, click "System Protection"
Now you can click "Configure," and turn off System restore and delete your restore points. This will give you countless GBs of storage back. Remember to run the restore or backup your system every once in a while.


You may wish to Defragment your machine, but I suggest instead converting to Flash.

4. Be a Machine
Read the post "Efficiencize" (coming soon)

Tuesday, February 23, 2010

convert your laptop to flash

My laptop hard drive has broken 3 times in 3 years. Luckily, I have Dell, so I get a new one overnighted for free. However, my warranty is expiring soon, so I decided to convert to a flash-based machine.

Flash-memory is superior to regular hard disk drive (HDD) memory in so many ways.
The problem, however, is the cost. This walk-through gives you the most memory for the lowest price.

What you get:
-A completely flash-memory-based machine (that will perform much, much faster), meaning no moving parts, longer battery life, and no HDD failure
-94GB of super-fast memory
-An empty external HDD (size: whatever your computer's HDD is now)

What you need:
-Less than 94 gigs of data on your current machine
-A small screwdriver
-A built-in memory card slot
-An ExpressCard slot
-$181 to invest

Here is how to do it in 4 steps.

Step 1. Buy the following:

OS/HDD replacement: $90
30GB SSD

Enclosure for old drive: $12
External

2 x 32GB Class 6 SD Card: $32 x 2 = $64
These go in the memory card readers

ExpressCard Memory Reader: $15
Make sure you have the slot on your computer for this

Step 2: Prep your machine
Download MigrateEasy
Put in one of your new 32GB SD cards into the built-in memory reader
Push in your new ExpressCard memory reader, after it installs, put the 2nd 32GB card in
Insert your 30GB SSD into the external enclosure, and connect this to your computer via USB

Step 3: Move your files & Clone
Move all of your music, downloads, etc. onto the two 32GB flash drives now mounted (visible in My Computer. Do NOT use the external SSD)
Make sure you have less than 27GB of files on your native hard drive
Run MigrateEasy and clone your hard drive onto the new SSD (the one in the enclosure)

Step 4: Install the SSD & Enjoy!
Turn off your computer, take out the battery
Remove the SSD from the enclosure, remove your HDD (refer to Google for instructions) from your computer
Install the new (cloned) SSD & battery into your computer & turn it on!
You can put your old HDD in the external enclosure and use it as an external drive for extra storage